If you run a brake service business, you already know that compressing the brake caliper is one of the most essential parts of a brake job. Yet, many technicians still struggle with it — pressing the piston incorrectly, skipping steps, or rushing the process. These mistakes can lead to uneven wear, brake fluid leaks, or even customer complaints about poor braking performance.
To compress a brake caliper, take off the wheel and loosen the caliper. Use a C-clamp or caliper tool to press the piston back slowly. Don’t force it—just steady pressure. Watch the brake fluid so it doesn’t spill. Once the piston is back in, put the pads on and tighten the caliper. That’s it—you’ve done it right.
Why Compress the Brake Caliper
To understand why you need to compress the brake caliper, it helps to know what happens inside the braking system. The caliper holds the brake pads and pushes them against the rotor every time you press the brake pedal. Inside the caliper sits a piston that moves outward slightly each time you brake. As the brake pads wear down, the piston gradually moves farther out to maintain contact.
When you install new brake pads, they’re thicker than the worn ones. That extra thickness means there’s no space left between the pads and the rotor unless you push the piston back in. This process—called compressing the brake caliper piston—creates the necessary clearance for the new pads to fit correctly.
If you don’t push the piston back, the caliper won’t go over the new pads, and the brakes might feel stiff or even get stuck. Pressing the piston simply gives the pads more room and helps the entire brake system work together as it should.
How to Compress Brake Caliper Step by Step
Tools You’ll Need Before You Start
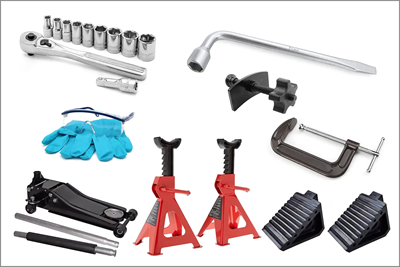
Before you begin, gather everything you need. Working with the right tools not only saves time but also keeps the caliper and other brake components safe from damage.
- C-clamp or brake caliper compression tool – the main tool to push the piston back evenly.
- Socket wrench – for removing caliper bolts.
- Flat screwdriver – to help separate the pads if needed.
- Brake cleaner – to remove dirt and old brake dust.
- Small tube or turkey baster – for removing excess brake fluid if the reservoir gets full.
- Protective gloves and safety glasses – to keep yourself safe.
Always ensure your tools are clean and in good working condition. Quality tools reflect the level of professionalism your business offers.
Step-by-Step Guide to Compressing the Brake Caliper

When everything’s set, you can start compressing the brake caliper. It’s not hard, but take your time and be gentle so you don’t damage the piston or the rubber seal.
Step 1: Get the car ready
Park the car on flat ground and make sure it won’t move. Loosen the wheel nuts a little before lifting it. Use a solid jack and place the stands safely under the car. Never skip safety — it’s the most important step.
Step 2: Remove the Wheel
Take a moment to inspect the area for leaks, corrosion, or worn-out parts. After jacking up the vehicle, remove all wheel lug nuts and take off the wheels to expose the brake assembly.
Step 3: Loosen the Caliper Bolts
Use your socket wrench to remove the caliper bolts carefully. Once removed, lift the caliper off the rotor and hang it with a wire or hook. Don’t let it hang by the brake hose—it can damage the line.
Step 4: Inspect the Caliper and Piston
Check the piston surface and rubber boot. Clean off dirt and brake dust with the cleaner. If the rubber is torn or leaking, the caliper should be replaced before continuing.
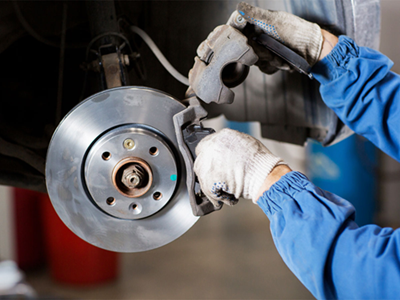
Step 5: Compress the Piston
Place an old brake pad in front of the piston to distribute pressure. Position the C-clamp or compression tool and tighten slowly until the piston retracts smoothly into the housing.
If you’re working on a rear caliper with a parking brake, the piston might need to rotate as it retracts—use the correct tool for that type.
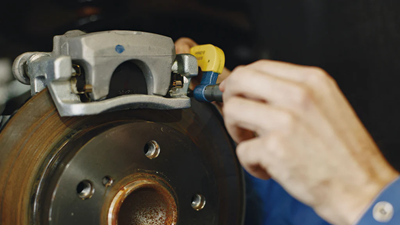
As the piston moves back, check the brake fluid reservoir under the hood. The fluid level will rise. If it gets too high, use the small tube or baster to remove some.
Step 6: Put the Caliper Back
When the piston is pushed all the way in, check that it’s flat and the rubber cover isn’t twisted. Slide in the new brake pads, then place the caliper back over them. Tighten the bolts firmly, but don’t overdo it.
Step 7: Check Everything
After the wheel is back on, press the brake pedal a few times until it feels solid. Look at the brake fluid and add a little if it’s low. Take a short drive to make sure the brakes feel smooth and stop evenly.
Pro Tip: Always test-drive the car briefly after service, applying brakes gently at first to ensure everything is working correctly.
Common Mistakes & Different Types of Calipers
Even good mechanics can make mistakes when they hurry. Here are a few things worth paying attention to:
- Don’t push the piston too hard. If you press it too far or too fast, you can damage the rubber seals or the piston itself.
- Loosen the brake fluid cap first. This helps release pressure and makes it easier to push the piston back.
- Use the right tool and angle. Pushing unevenly can jam the piston or leave marks on its edge.
- Check the rubber seals. If they look cracked or dry, replace them. Bad seals can cause leaks later.
Different types of calipers also need a slightly different approach:
- Floating calipers move on sliding pins. Make sure those pins are clean and have enough grease.
- Fixed calipers have pistons on both sides, so push each one back evenly.
- Rear calipers with a parking brake often need the piston to turn while you push it in. Use the right tool for that.
- Electronic parking brake (EPB) systems might need a scan tool to move the piston back. Always check the car’s manual before starting.
Summary
Finally, always keep the basics in mind: use solid jack stands, open the brake fluid cap before you start, and press the brake pedal afterward to bring the pressure back. For anyone in the brake caliper business, knowing how to compress brake caliper the right way shows more than skill — it shows pride in your work and respect for your customers. It’s not just about fixing cars; it’s about earning trust and proving that quality and care still matter in every job you do.