Learning how to test a brake caliper is essential when an incoming shipment looks acceptable but may contain hidden functional defects. A clean coating can hide poor piston movement, damaged seals, or incorrect dimensions. I use a layered inspection process—visual, mechanical, dimensional, and hydraulic—to help aftermarket buyers identify risks before products enter distribution.
To test a brake caliper, I first verify the part number and visually inspect the casting, coating, piston, dust boot, threads, and fluid ports. I then check piston retraction and slider movement, measure critical dimensions against approved drawings, inspect the bleed screw, and perform a controlled hydraulic pressure test using the supplier’s specified limits.
Based on returns we have reviewed from global buyers, visual appearance alone rarely tells the full story. A reliable incoming inspection must separate cosmetic concerns from functional defects. The following protocol explains what a buyer can reasonably check without turning a warehouse quality station into a full engineering laboratory.
What Tools Do Buyers Need to Test a Brake Caliper?
Many incoming quality inspectors know what they want to check, but they lack the tools needed to produce repeatable results. This gap creates false passes, inconsistent judgments, and supplier disputes based on opinions rather than evidence.
A buyer needs, at minimum, a digital or dial caliper, an outside micrometer, a dial bore gauge, a protected piston retraction fixture, and a brake fluid pressure tester. I also recommend thread gauges, a flat reference surface, inspection lighting, absorbent test paper, and an approved master sample or dimensional drawing.
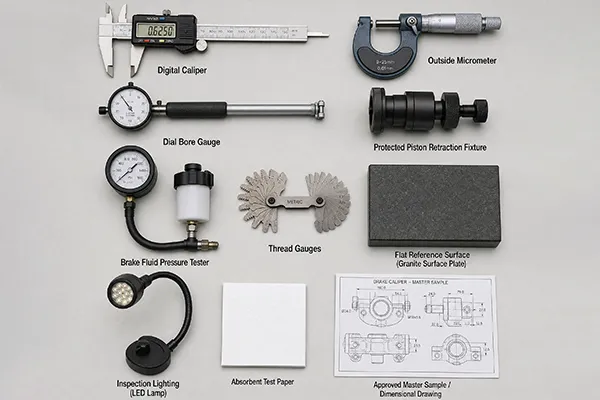
Minimum equipment for incoming inspection
I divide brake caliper inspection tools into three groups: basic screening tools, dimensional tools, and functional test equipment.
| Tool | What I use it to check | Main limitation |
|---|---|---|
| Inspection light | Casting, coating, boots, ports, and visible damage | It cannot reveal internal defects |
| Digital or dial caliper | Mounting dimensions, bracket dimensions, and general feature locations | It usually lacks the precision needed for piston-to-bore clearance |
| Outside micrometer | Piston outside diameter and other precision features | It requires correct calibration and technique |
| Dial bore gauge | Caliper bore diameter, taper, and out-of-round condition | It requires a reference standard and trained operator |
| Thread plug gauge | Hydraulic port and mounting thread condition | It must match the specified thread standard |
| C-clamp or controlled press fixture | Smooth piston retraction | An uncontrolled tool can damage the piston or boot |
| Slider movement fixture | Guide pin travel and resistance | The acceptance range depends on the caliper design |
| Hydraulic pressure tester | Leakage, sealing, and piston response | It needs a safe fixture and approved pressure profile |
| Surface roughness tester | Quantitative bore or piston finish checks | It is usually part of an audit or factory laboratory |
| Approved drawing or master sample | Acceptance criteria | An unapproved sample can repeat an existing error |
A digital caliper is useful, but it does not replace a bore gauge or micrometer.1 One common pattern we have observed is that inspectors measure every feature with the same handheld caliper. They may record a number, but the number may not be accurate enough to evaluate a close-clearance component.
Why drawings matter more than generic tolerances
I do not recommend using one universal piston clearance, bore diameter, or pressure range for every brake caliper. Caliper designs vary by vehicle application, piston material, seal geometry, bore finish, and manufacturing process.2
The buyer should request the following documents before inspection:
- An approved product drawing or agreed critical-dimension sheet
- The correct OE cross-reference and application list
- A control plan for critical characteristics
- The supplier’s hydraulic test pressure and hold time
- Packaging and corrosion-protection requirements
- An approved visual defect standard
- Traceability requirements for batch, line, or production date
I treat these values as the product’s minimum acceptable requirements, not as universal engineering specifications. If the supplier cannot provide acceptance criteria, I recommend agreeing on them before the shipment arrives.
I have seen buyers reject acceptable parts and accept defective parts for the same reason: neither side had agreed on a measurable standard.
How Do I Visually Test a Brake Caliper?
A visual inspection is the fastest way to screen a shipment, but it is only the first filter. A caliper can look new while containing a stiff piston, damaged sealing surface, blocked passage, or out-of-spec mounting feature.
I visually test a brake caliper by checking identification, casting integrity, machining, coating, piston condition, dust boots, threads, ports, guide pins, and packaging. I separate cosmetic issues from defects that can affect sealing, fitment, movement, corrosion resistance, or traceability.
Step 1: Verify identity and traceability
I start with the label before I inspect the metal component. A technically acceptable caliper can still create a costly return if it is packed under the wrong reference.
I compare:
- The part number on the product and box
- The left-hand or right-hand position
- The vehicle application
- The piston quantity and approximate size
- The bracket configuration
- The hydraulic port position
- The bleed screw position
- The casting and production codes
- The batch or date code
- The accessories included in the package
I pay special attention to visually similar calipers. Two references can share a casting shape while using different mounting distances, piston diameters, port threads, or brackets.
Step 2: Inspect the casting and machined areas
I check the casting under bright, angled light. I look for cracks, deep impact marks, incomplete material, exposed cavities, and damage near highly loaded or machined areas.
I also examine:
- Mounting ears
- Bridge areas
- Hydraulic port bosses
- Bleed screw bosses
- Piston bore edges
- Guide pin bores
- Bracket contact surfaces
A small surface mark is not automatically a functional defect. However, a crack, deep cavity, or damage that reaches a sealing, threaded, or mounting surface requires quarantine and supplier review.
Buyers should also understand the boundary of visual inspection. Some casting porosity remains internal and cannot be found with warehouse lighting.3 A factory may need pressure testing, sectioning, X-ray inspection, or another validated process to investigate suspected internal porosity.
Step 3: Inspect coating and corrosion protection
I check whether the coating is complete and whether it interferes with functional surfaces. I look for bare patches, peeling, blistering, heavy runs, trapped debris, and coating inside areas that must remain dimensionally controlled.
A coating issue becomes more serious when it affects:
- Thread engagement
- Slider movement
- Mounting contact
- Brake hose sealing
- Piston or boot movement
- Part identification
I do not judge corrosion resistance from color or gloss alone. Salt-spray performance and coating thickness require documented test methods.4 Visual inspection can identify obvious process inconsistency, but it cannot confirm long-term corrosion performance.
Is Oil on a New Brake Caliper a Defect?
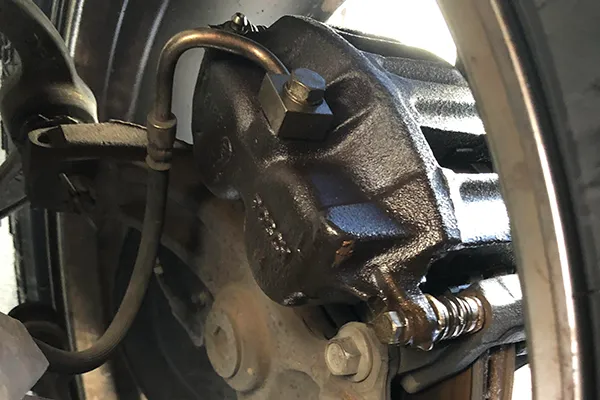
Oil around the piston or inside the package often causes immediate concern. I understand the reaction because buyers associate visible fluid with leakage. However, fluid appearance alone does not prove that the caliper has failed.
A thin, controlled film may be factory assembly lubricant or anti-rust oil rather than leaked brake fluid. I wipe the area, record the location, inspect the boot and packaging, and perform a repeat hydraulic test. I do not classify the caliper as leaking until the evidence shows active fluid escape or pressure loss.
Why manufacturers use assembly lubricant
Brake caliper manufacturers may apply a compatible assembly lubricant or corrosion-protection fluid during production. The fluid can help with component assembly, temporary corrosion protection, and seal-safe movement.5
Based on returns we have seen from buyers, a small amount of assembly oil is sometimes reported as “brake fluid leakage” before the product has ever been connected to a hydraulic system. This misunderstanding can create avoidable returns, debit notes, and lengthy complaint investigations.
I usually compare the condition against several indicators:
| Observation | Possible assembly oil | Possible leakage or contamination |
|---|---|---|
| Fluid amount | Thin film or small local residue | Repeated wetting, pooling, or spreading |
| Location | Assembly contact area or protected metal surface | Hydraulic sealing point after pressure testing |
| After wiping | It does not reappear under an approved test | It reappears during or after pressure application |
| Packaging | Light controlled residue | Saturated packaging or widespread uncontrolled fluid |
| Pressure behavior | Stable according to the test method | Measurable pressure loss or visible fluid escape |
This table supports screening, but it does not replace analysis. Different oils and brake fluids can look similar. I do not recommend identifying a fluid solely by its color, smell, or feel.
How I investigate questionable fluid
I use a documented sequence:
- I photograph the fluid before wiping it.
- I record its exact location and approximate amount.
- I inspect the dust boot, piston edge, bleed screw, and hydraulic inlet.
- I wipe the area with approved lint-free material.
- I place the caliper in a safe hydraulic fixture.
- I run the supplier-approved pressure and hold-time profile.
- I check whether fresh fluid appears.
- I retain the sample if the result remains uncertain.
I also ask the supplier for the assembly lubricant’s technical data or process specification when a dispute occurs. The supplier should confirm that the lubricant is compatible with the intended seals and brake fluid system.
I classify active leakage under controlled pressure as a functional defect. I do not classify a small, stable film of approved assembly oil as a defect simply because the component looks wet.
How Do I Test Brake Caliper Piston and Slider Movement?
Piston and slider movement can reveal problems that a visual inspection misses. A clean caliper may still contain corrosion, incorrect clearance, a twisted boot, excessive grease, damaged guide components, or poor machining.
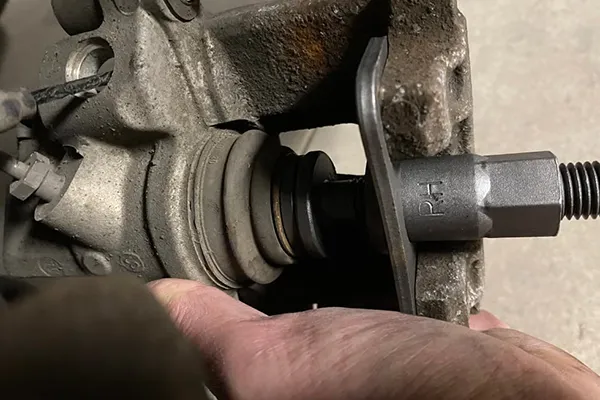
I test movement by placing the caliper in a protected fixture and applying slow, even force. The piston should retract smoothly without sticking, sudden release, or abnormal scraping. On a floating caliper, the guide pins should travel consistently without seizure, excessive free play, or boot distortion.
Step 1: Prepare a safe retraction test
I first confirm whether the hydraulic inlet is open, vented through an approved fixture, or sealed by a transport plug. A sealed fluid chamber can resist piston movement even when the caliper is not defective.6
I then protect the piston face and caliper surfaces. I use parallel plates or a controlled fixture so the force remains centered. I avoid gripping the piston with serrated tools because scratches can damage sealing performance or corrosion resistance.7
For a multi-piston caliper, I restrain the other pistons with suitable blocks. This approach prevents one piston from moving outward unexpectedly while I press another inward.
Step 2: Evaluate how the piston moves
I do not judge the piston only by whether it eventually moves. I watch the entire movement pattern.
I look for:
- Smooth and progressive retraction
- Similar behavior among samples from the same batch
- No sticking followed by a sudden jump
- No metallic scraping
- No visible piston tilting
- No dust boot twisting or pulling out of its groove
- No fresh fluid appearing around the piston
- No damage to the piston surface
A piston requires seal resistance, so “very easy movement” is not always the goal. Likewise, a piston that needs some controlled force is not automatically defective. The meaningful question is whether its movement matches the approved design, master sample, or supplier’s force range.
A C-clamp can provide a practical screening test, but it does not produce a reliable force measurement by itself. If movement complaints are frequent, I recommend a force gauge or instrumented press. That equipment turns a subjective statement such as “the piston feels tight” into comparable data.
Step 3: Check sliders on floating calipers
I move each guide pin through its normal range. I inspect the boot during movement because a boot can look acceptable at rest but fold, twist, or pull loose when the pin travels.
I check for:
- Smooth pin travel
- Consistent resistance
- Correct grease presence
- Intact guide pin surfaces
- Secure boot seating
- No corrosion or foreign particles
- No excessive radial looseness
- No interference from coating or burrs
I do not add random grease during incoming inspection. An unapproved lubricant can swell rubber components or alter movement.8 I document the condition and use only the specified compatible material if the inspection procedure allows servicing.
How Do I Dimensionally Test a Brake Caliper?
Dimensional problems often remain invisible until a customer reports fitment trouble, pad interference, uneven movement, or leakage. Buyers need measurements because appearance cannot confirm whether a caliper matches the drawing.
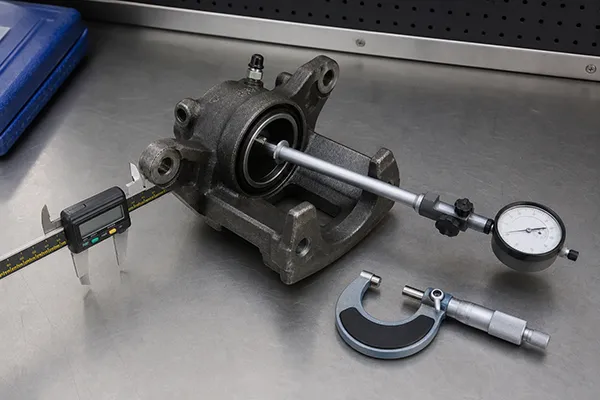
I dimensionally test a brake caliper by measuring critical mounting, piston, bore, bracket, and port features against an approved drawing. I use a caliper for general dimensions, a micrometer for piston diameter, and a dial bore gauge for bore size, taper, and out-of-round condition.
Start with fitment-related dimensions
I prioritize features that determine whether the caliper can be sold for the stated application. The exact list varies, but it often includes:
- Mounting-hole spacing
- Mounting-hole or thread size
- Bracket width and offset
- Pad abutment dimensions
- Disc clearance
- Caliper centerline position
- Piston diameter
- Hydraulic inlet thread
- Bleed screw thread
- Guide pin diameter and position
I use the product drawing as the controlling reference. I do not measure a random old unit and assume that it represents the correct specification. Used calipers may contain wear, corrosion, previous machining, or application differences.
Measure the bore correctly
A handheld dial or digital caliper is not the preferred tool for evaluating close piston-to-bore relationships. Its jaws, operator pressure, alignment, and resolution can produce a misleading result.
I use a calibrated dial bore gauge that has been zeroed against an appropriate standard. I measure the bore at more than one depth and in more than one direction.9 This method helps identify:
- Excessive or insufficient diameter
- Taper from one end to the other
- Out-of-round condition
- Local machining irregularities
I measure the piston outside diameter with an outside micrometer at agreed locations. I then compare both values with the drawing and control plan.
I avoid publishing one universal acceptable piston-to-bore clearance. Different designs use different materials, seals, coatings, and tolerances. The correct minimum acceptable range must come from the approved technical specification for that part.
Understand the limits of incoming measurement
A buyer usually cannot inspect the internal bore without disassembling the caliper. Disassembly can damage seals, affect traceability, and make the product unsellable. I therefore treat internal measurement as a destructive audit unless the supplier and buyer have agreed on a controlled reassembly process.
Bore surface roughness presents another limitation. A visual check may identify deep scoring, rust, or severe tool marks, but it cannot quantify roughness. A profilometer is required when a dispute depends on a specified surface roughness value.10
I recommend that buyers use two dimensional inspection levels:
- Routine incoming checks should cover accessible fitment and identification dimensions.
- Periodic destructive audits should cover piston diameter, bore geometry, seal condition, and internal surface finish.
This combination controls risk without requiring every caliper to be opened.
How Do I Pressure-Test a Brake Caliper and Check the Bleed Screw?
A hydraulic test provides stronger evidence than appearance alone because it challenges the sealing system under controlled conditions. However, an unsafe or poorly defined pressure test can damage parts and create misleading results.
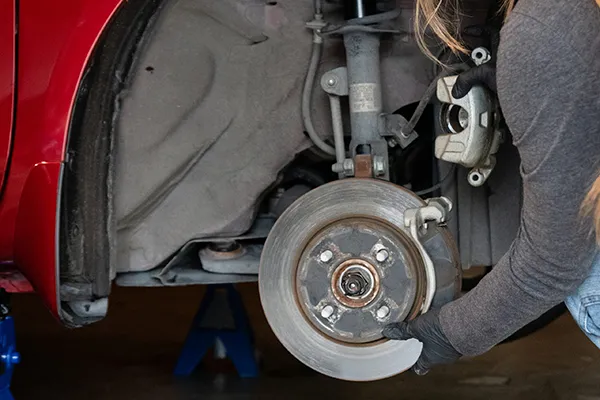
I pressure-test a brake caliper in a guarded fixture with compatible test fluid, calibrated instruments, and the supplier-approved pressure profile. I monitor pressure stability, visible leakage, piston response, inlet sealing, and bleed screw sealing. I never use uncontrolled compressed air as a substitute for a hydraulic test.
Build a controlled test setup
I use a fixture that safely restrains piston movement. The fixture needs to represent the functional space without allowing the piston to eject. I connect the hydraulic inlet with the correct thread and sealing method.
A basic controlled setup includes:
- A guarded caliper fixture
- Compatible hydraulic test fluid
- A calibrated pressure gauge or transducer
- A controlled pump
- Correct inlet adapters
- A timer or data logger
- Absorbent material for detecting external fluid
- Eye and face protection
- A written test procedure
I do not recommend improvised compressed-air tests. Compressed gas stores energy and can eject a piston with severe force.11 Hydraulic equipment also involves risk, but a designed fixture and controlled procedure reduce that risk.
Follow an approved pressure profile
A useful pressure test normally includes filling, air removal, pressure increase, hold time, release, and post-test inspection. However, I do not publish one pressure value for all calipers. Passenger vehicle, light commercial, heavy-duty, and specialty calipers can have different validated requirements.
I ask the supplier to define:
- Test fluid
- Filling and bleeding method
- Initial low-pressure stage
- Proof or high-pressure stage
- Pressure increase rate
- Hold time
- Acceptable pressure decay
- External leakage criteria
- Piston restraint dimensions
- Number of cycles
- Post-test cleaning requirements
The buyer should treat these as agreed minimum acceptance conditions. A random pressure selected by the inspector may be too low to reveal a problem or high enough to damage a valid component.
Inspect the bleed screw
I examine the bleed screw threads, hex, tip, and sealing seat. I also verify that the bleed screw is accessible in the installed orientation and located where air can be removed from the hydraulic chamber.12
During the hydraulic test, I check whether fluid appears around the bleed screw after it has been closed according to the approved fixture procedure. I do not solve a leak by applying uncontrolled extra force. Excessive tightening can damage the screw, seat, or caliper body and hide the original cause.
If leakage appears, I quarantine the sample and document:
- Applied pressure
- Hold time
- Fluid location
- Pressure decay
- Bleed screw condition
- Inlet adapter condition
- Sample batch and traceability code
I also verify the test connection before blaming the caliper. An incorrect adapter, damaged test seal, or trapped air can produce a false failure.
How Can Buyers Create a Standard Brake Caliper Inspection Protocol?
Without a standard protocol, inspectors may make different decisions about identical parts. One person may reject harmless assembly oil, while another may pass a stiff piston because the coating looks good.
I recommend a documented inspection sequence: identity verification, visual screening, piston and slider movement, accessible dimensional checks, bleed screw inspection, and hydraulic testing. Buyers should define sampling levels, defect classifications, acceptance criteria, traceability, and escalation rules before the shipment arrives.
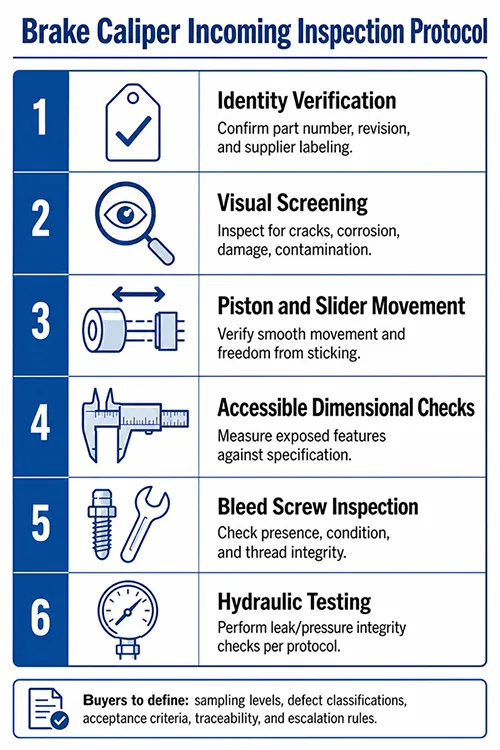
Use a repeatable inspection sequence
I use the following order because each stage filters risk without unnecessarily damaging the product:
- I verify documents and part identity.
- I inspect packaging and corrosion protection.
- I examine the casting, coating, threads, ports, piston, and boots.
- I check piston retraction and slider movement.
- I measure accessible critical dimensions.
- I inspect the bleed screw and hydraulic inlet.
- I pressure-test the agreed sample quantity.
- I perform destructive dimensional audits when required.
- I record results by batch and production code.
- I quarantine failures before stock release.
This sequence helps preserve evidence. For example, I photograph fluid residue before wiping it, and I record piston behavior before disassembling the sample.
Classify defects by risk
I recommend separating defects into agreed categories rather than treating every issue equally.
| Defect category | Typical examples | Common action |
|---|---|---|
| Critical | Hydraulic leakage, major crack, wrong safety-critical configuration | Quarantine and immediate escalation |
| Major | Incorrect mounting dimensions, seized piston, damaged thread, wrong application label | Hold batch and expand inspection |
| Minor | Limited cosmetic variation that does not affect function or corrosion requirement | Record and evaluate against visual standard |
| Investigation required | Unidentified oil, inconsistent movement, questionable pressure decay | Retest under controlled conditions |
The final classification must match the buyer-supplier quality agreement. Some organizations use zero acceptance for defined critical defects, while others apply a formal sampling standard. I recommend that both sides agree on the sampling plan and acceptance quality limit before mass shipments.
Keep evidence that supports corrective action
A complaint such as “the caliper is bad” gives a supplier little useful information. I collect evidence that can support root-cause analysis.
A strong inspection record includes:
- Part number and application
- Purchase order and shipment number
- Batch and production codes
- Sample quantity and selection method
- Inspection equipment IDs
- Calibration status
- Measured values
- Pressure and hold time
- Photos and videos
- Fluid location
- Pass/fail criteria
- Inspector name and date
- Retained sample location
I have found that clear evidence changes the tone of a supplier discussion. Both sides can focus on containment and correction instead of debating subjective impressions.
I also recognize the protocol’s limits. Incoming inspection may not detect hidden casting porosity, long-term seal degradation, incorrect rubber formulation, fatigue weakness, or every contaminated internal passage. Those risks require supplier process control, material verification, endurance testing, and factory-level quality systems.
Frequently Asked Questions
Can I test a brake caliper by looking at it?
I use visual inspection only as the first screening step. It can reveal cracks, coating defects, damaged boots, wrong references, and thread damage. It cannot confirm piston clearance, bore geometry, internal seal quality, or hydraulic integrity. I combine visual checks with movement, measurement, and pressure tests.
Does oil around a new brake caliper mean it is leaking?
I do not assume that visible oil means leakage. A thin film may be approved assembly lubricant or anti-rust oil. I document and wipe the area, then perform a controlled hydraulic test. Fresh fluid that reappears under pressure provides stronger evidence of an actual leak.
Can I use compressed air to test piston movement?
I do not recommend uncontrolled compressed air. Compressed gas can eject the piston suddenly and cause injury or product damage. I use a guarded hydraulic fixture or a controlled mechanical retraction fixture. The test method should prevent piston ejection and protect the sealing surfaces.
Should every brake caliper receive a hydraulic test?
I recommend agreeing on the test scope with the supplier. Manufacturers may perform end-of-line testing, while buyers may use batch sampling for incoming verification. The correct frequency depends on risk, complaint history, order volume, traceability, and the agreed quality plan.
What should I do when one sample fails?
I quarantine the affected batch and verify the test method first. I then retest with calibrated equipment, increase the sample size according to the quality plan, preserve failed samples, and notify the supplier with complete evidence. I avoid releasing or reworking the batch until both sides define disposition.
Conclusion
A reliable process for how to test a brake caliper must go beyond asking whether the product looks new. I recommend a layered incoming inspection that covers identity, visual condition, assembly oil, piston and slider movement, critical dimensions, bleed screw sealing, and hydraulic performance. I also use approved drawings and supplier-specific test limits instead of unsupported universal tolerances.
GDST Auto Parts supports global aftermarket buyers with brake caliper documentation, quality control, OEM and private-label services, and more than 5,000 OE references. Contact our team to discuss inspection criteria, technical data, sample evaluation, or a brake caliper sourcing project.
"The Gauge Block Handbook", https://www.nist.gov/document/mono180pdf. Dimensional-metrology guidance distinguishes calipers from micrometers and bore gauges by resolution, contact geometry, and measurement uncertainty, supporting the use of specialized instruments for close-tolerance diameters and bore geometry. Evidence role: general_support; source type: education. Supports: Metrology guidance should explain that calipers, micrometers, and bore gauges have different resolutions, contact geometries, and appropriate applications.. Scope note: General metrology guidance does not establish the required instrument or allowable uncertainty for a particular brake-caliper drawing. ↩
"Cal Poly BSAE Brake Caliper", https://digitalcommons.calpoly.edu/cgi/viewcontent.cgi?filename=1&article=1899&context=mesp&type=additional. Engineering studies of hydraulic brake calipers identify piston and housing materials, seal geometry, surface condition, and application loads as interacting design variables rather than universal constants. Evidence role: mechanism; source type: paper. Supports: Technical literature should describe how piston material, seal geometry, bore finish, and application requirements influence caliper behavior and design tolerances.. Scope note: Such studies support design dependence in general but do not supply acceptance limits for the specific caliper under inspection. ↩
"Automated Porosity Characterization for Aluminum Die ... - PMC", https://pmc.ncbi.nlm.nih.gov/articles/PMC11086142/. Nondestructive-testing references describe visual inspection as a surface-oriented method and radiographic techniques as methods capable of revealing volumetric discontinuities such as internal casting porosity. Evidence role: mechanism; source type: education. Supports: Nondestructive-testing guidance should establish that visual testing is limited to accessible surface conditions, while radiography or computed tomography can reveal internal porosity.. Scope note: The presence and acceptability of porosity in a particular caliper still depend on its material specification, location, size, and validated inspection criteria. ↩
"the measurement of thickness", https://nvlpubs.nist.gov/nistpubs/Legacy/circ/nbscircular585.pdf. Standardized methods such as ISO 9227 or ASTM B117 specify controlled salt-spray exposure conditions, while separate coating-thickness methods define how film thickness is measured and reported. Evidence role: general_support; source type: institution. Supports: Recognized standards should define controlled salt-spray exposure and coating-thickness measurement procedures.. Scope note: Salt-spray results are comparative test outcomes and do not directly predict a component's exact service life in real operating environments. ↩
"Parker O-ring Handbook", https://wp.optics.arizona.edu/optomech/wp-content/uploads/sites/53/2016/10/Parker-O-ring-handbook.pdf. Tribology and seal-engineering literature indicates that compatible assembly lubricants can reduce installation friction and seal damage, while protective films can provide temporary barriers against corrosion. Evidence role: mechanism; source type: paper. Supports: Research should explain how compatible lubricants reduce friction during seal assembly and movement and how protective fluids can limit short-term corrosion.. Scope note: These functions do not establish that an unidentified residue is approved for a particular brake-fluid system or elastomer formulation. ↩
"Chapter Three System Implementation", https://repository.sustech.edu/bitstream/handle/123456789/15244/Chapter%20three.pdf?sequence=5&isAllowed=y. Basic hydraulic-cylinder analysis shows that piston displacement in a closed, liquid-filled chamber generates opposing pressure unless fluid can leave the chamber or another compliant volume is available. Evidence role: mechanism; source type: education. Supports: Hydraulics references should explain that displacing a piston in a closed, liquid-filled chamber requires fluid displacement and can produce opposing pressure.. Scope note: This mechanism is one possible cause of retraction resistance and does not exclude mechanical binding, seal friction, corrosion, or dimensional defects. ↩
"Cal Poly BSAE Brake Caliper", https://digitalcommons.calpoly.edu/cgi/viewcontent.cgi?filename=1&article=1899&context=mesp&type=additional. Research on reciprocating hydraulic seals shows that counterface scratches and excessive surface irregularity can disturb sealing contact, promote seal wear, and create leakage paths; damage to a protective finish can also increase corrosion susceptibility. Evidence role: mechanism; source type: paper. Supports: Seal research should show that scratches and surface defects on moving hydraulic interfaces can disrupt sealing films, abrade seals, and expose surfaces to corrosion.. Scope note: Evidence from general hydraulic sealing is mechanistically relevant but may not quantify the failure threshold for a specific brake-caliper piston and seal design. ↩
"Interpretation ID: aiam5353", https://www.nhtsa.gov/interpretations/aiam5353. Hydraulic brake-fluid specifications include rubber-swelling and compatibility tests because exposure to incompatible fluids can change elastomer dimensions and physical properties, potentially affecting seal and guide movement. Evidence role: mechanism; source type: government. Supports: Brake-fluid regulations or elastomer studies should document swelling and physical-property tests used to assess compatibility with hydraulic brake rubber.. Scope note: Compatibility depends on the specific elastomer compound, lubricant chemistry, concentration, temperature, and exposure duration. ↩
"the measurement of thickness", https://nvlpubs.nist.gov/nistpubs/Legacy/circ/nbscircular585.pdf. Bore-measurement guidance uses readings at multiple axial positions and angular orientations to detect changes in diameter associated with taper and out-of-roundness. Evidence role: mechanism; source type: education. Supports: Metrology guidance should explain that readings at different axial and angular positions reveal diameter variation associated with taper and out-of-roundness.. Scope note: A limited set of bore-gauge readings does not constitute a complete cylindricity measurement and may miss localized form errors. ↩
"Stylus Profilometer | NIST", https://www.nist.gov/laboratories/tools-instruments/stylus-profilometer. Surface-metrology standards define roughness parameters from measured surface profiles, so quantitative conformity to a specified value requires calibrated profile-measurement equipment and an appropriate evaluation procedure. Evidence role: definition; source type: research. Supports: Surface-metrology sources should define profilometry as an instrumental method for measuring and calculating specified surface-texture parameters.. Scope note: A contact profilometer is not the only valid technology; optical instruments may also be appropriate when permitted by the applicable specification. ↩
"Tool box talk for LOTO & stored energy", https://www.osha.gov/sites/default/files/2018-12/fy15_sh-27664-sh5_Toolbox_LOTO_Release_Stored_Energy.pdf. Government pressure-testing guidance identifies pneumatic testing as hazardous because compressed gas stores releasable energy that can propel components or fragments if restraint or containment fails. Evidence role: mechanism; source type: government. Supports: Safety guidance should explain that pneumatic systems store substantially releasable energy and that failed or released components can become projectiles.. Scope note: The severity of a caliper-piston ejection depends on pressure, gas volume, piston area, travel, fixture design, and surrounding containment. ↩
"Anhydrous Ammonia - Purdue Agriculture", https://ag.purdue.edu/department/extension/ppp/resources/ppp-publications/mobile/ppp-1401.html. Hydraulic-brake references explain that entrained or trapped air must be displaced to a bleed outlet, making the bleed screw's installed position and communication with high points important to effective air removal. Evidence role: mechanism; source type: education. Supports: Hydraulic-brake training or engineering material should explain that air collects at high points and that the bleed outlet must communicate with trapped-air regions.. Scope note: Actual bleedability also depends on internal passage geometry, component orientation, flow procedure, and the presence of multiple trapped-air pockets. ↩